By Hair Destination Studio — Mumbai’s Trusted Non-Surgical Hair Replacement Experts
Choosing to get a hair patch is a big step toward regaining confidence, youthfulness, and a natural-looking head of hair. But before you walk into the studio for your first session, one question always comes to mind:
“What exactly happens during a hair patch fitting?”
If you’re curious about the procedure, the tools involved, the time required, or whether it hurts, this blog is for you. At Hair Destination Studio, many first-time clients come in nervous but walk out amazed at how smooth, comfortable, and transformational the experience is.
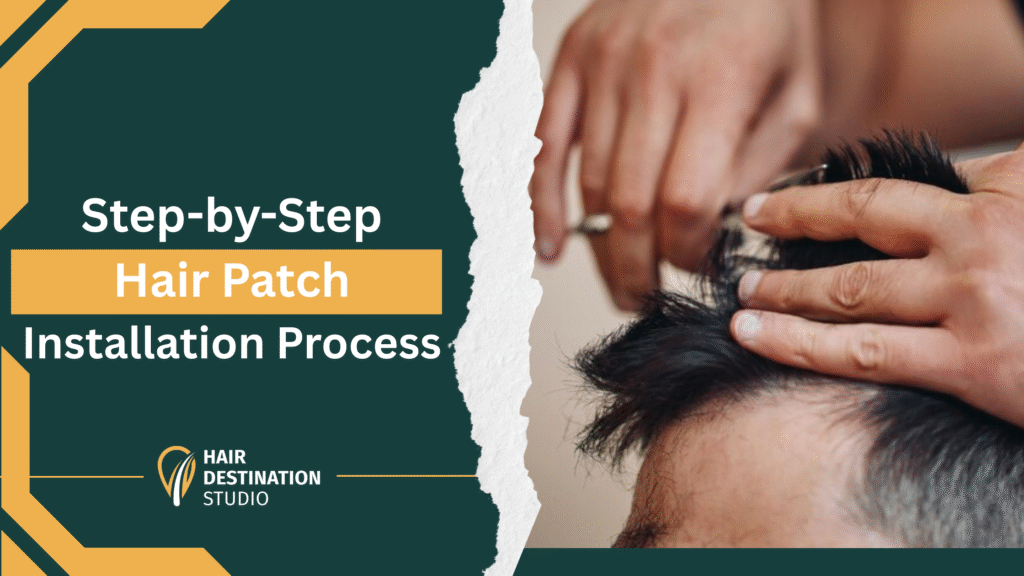
In this comprehensive guide, we break down the step-by-step hair patch installation process so you know exactly what to expect.
Let’s walk through the entire journey—from consultation to final styling.
Why Understanding the Process Matters
Hair patch fitting is a painless, non-surgical, and 100% customised procedure. Knowing the steps beforehand helps you:
- Feel confident and prepared.
- Understand how your hair patch is selected and installed.
- Learn how long the process takes.
- Know what results to expect.
- Ask the right questions during your appointment.
Transparency is one of the reasons why Hair Destination Studio is trusted across Mumbai. We want every client to feel informed and comfortable.
Step 1: Personal Consultation & Face Analysis
Your journey begins with a one-on-one consultation with a Hair Destination Studio specialist. This is the most crucial step because it lays the foundation for achieving a natural look.
What happens during a consultation?
1. Assessment of your hair loss level
Every scalp is different. The expert checks:
- Baldness area
- Hair density
- Hair thinning pattern
- Scalp condition
2. Face shape analysis
To ensure the final look suits your features, Hair Destination Studio evaluates your:
- Face shape (oval, round, square, etc.)
- Jawline
- Forehead structure
- Natural hairline
3. Discussion of your goals
You share:
- The hairstyle you want
- Your preferred density
- Colour match requirements
- Lifestyle factors (gym, sweating, job type)
4. System selection
Based on this evaluation, the specialist recommends:
- Type of base (lace, mono, skin, silk)
- Hair texture (straight/wavy/curly)
- Density level
- Exact shape & size needed
- Duration: 10–20 minutes
- Pain level: Zero
- Purpose: Total customisation for best results
At Hair Destination Studio, no hair patch fitting begins without this detailed blueprint.
Step 2: Measuring & Template Creation
Next, the expert precisely measures the affected area.
What happens in this step?
1. Scalp measurement
Using professional measurement tools, the expert determines:
- Width of the bald area
- Length of the bald area
- The curvature of your scalp
2. Template marking
A transparent sheet or mesh is used to create a scalp template, which ensures the patch:
- Fits accurately
- Looks symmetrical
- Blends naturally into your existing hair
3. Testing the comfort level
You’ll be shown how the base material feels on your scalp.
- Duration: 5–10 minutes
- Pain level: Zero
- Purpose: A perfectly fitting, natural-looking patch
Step 3: Scalp Preparation
Before the patch is attached, the scalp must be cleaned and prepped.
What does scalp preparation include?
1. Cleaning the scalp
The area is cleaned with:
- Alcohol wipes
- Antimicrobial solutions
This removes:
- Oil
- Sweat
- Dust
- Dead skin
2. Trimming hair (if required)
If you have any remaining hair in the patch area, it may be trimmed to ensure smooth attachment.
3. Skin protection
A skin-safe protective barrier is applied to avoid irritation.
- Duration: 5 minutes
- Pain level: Zero
- Purpose: Long-lasting, secure attachment
Hair Destination Studio takes hygiene extremely seriously—every tool is sanitised before use.
Step 4: Base Cutting & Customisation
This is where your system is shaped by the template created earlier.
What happens here?
1. Cutting the base
The chosen hair patch is trimmed precisely to match:
- Your scalp measurements
- Your head’s curvature
- Your natural hairline shape
2. Customising front hairline
Depending on your preference, Hair Destination Studio can create:
- A straight hairline
- Natural receded hairline
- Widow’s peak
- Soft curve
3. Density blending
The patch density is matched to your remaining natural hair, so it blends invisibly.
- Duration: 10–15 minutes
- Pain level: Zero
- Purpose: Making the patch look like it naturally belongs to your head
Step 5: Attachment Process
This is the part most clients are curious about.
There are two primary methods of attachment used by professional studios:
Method 1: Tape Attachment (Most Common)
Steps:
- Medical-grade adhesive tapes are applied to the base.
- The tapes are positioned strategically around the perimeter.
- The patch is aligned perfectly before placement.
- The system is gently pressed down for secure bonding.
Best for:
- Sweaty scalps
- Gym-goers
- Scalps sensitive to glue
Lasts:
1–2 weeks before touch-up (depending on lifestyle)
Method 2: Glue Attachment
Steps:
- Skin-safe glue is applied to the scalp.
- It is allowed to dry until transparent & tacky.
- The patch is placed precisely on the area.
Best for:
- Ultra-thin skin bases
- Invisible hairlines
- Longer hold times
Lasts:
2–4 weeks before service
Hair Destination Studio uses only premium, dermatologist-tested adhesives to ensure comfort and durability.
- Duration: 10–20 minutes
- Pain level: Zero
- Purpose: Secure, comfortable, natural-looking attachment
Step 6: Precision Hair Cutting & Styling
This is where the magic happens.
Once the patch is attached securely, a professional hairstylist takes over.
What happens during styling?
1. Blending with your real hair
The stylist ensures:
- No visible transition line
- Perfect blending of length and texture
- Natural flow from patch to original hair
2. Custom haircut
The stylist gives a haircut that matches:
- Your face shape
- Your personality
- Your preferred hairstyle
Whether you want:
- A fade
- A textured quiff
- A slick back
- A messy fashion cut
- A corporate hairstyle
- Your hair patch will be styled exactly like natural hair.
3. Hairline finishing
The front hairline is refined to make it:
- More natural
- Softer
- Undetectable
- Duration: 20–30 minutes
- Pain level: Zero
- Purpose: Bringing your entire look together
Step 7: Final Touches & Quality Check
Before you leave, Hair Destination Studio performs a detailed evaluation.
What they check:
- Patch stability
- Hairline realism
- Density matching
- Base comfort
- Blending accuracy
- Styling symmetry
- Ease of movement
You’ll be shown your new look in:
- Natural light
- Studio light
- Different angles
- This ensures your transformation looks flawless everywhere.
Duration: 5 minutes
Step 8: Aftercare Guidance & Maintenance Scheduling
Hair Destination Studio believes in long-term care—not just installation.
What you learn during aftercare training:
- How to wash your hair patch
- What products to use/avoid
- How to style it daily
- How to sleep with it
- Sweating guidelines
- Maintenance schedule
Recommended maintenance:
- Every 3–4 weeks at Hair Destination Studio
Clients love that Hair Destination Studio keeps the process simple, stress-free, and supportive.
How Long Does the Entire Hair Patch Fitting Take?
On average:
45 minutes to 1.5 hours
It depends on:
- Customisation
- Base type
- Styling complexity
Most clients are shocked at how quickly they get a fully natural head of hair.
Does Hair Patch Installation Hurt?
Absolutely not.
There are:
- No needles
- No cuts
- No pain
- No surgery
- No healing
Most clients say the process is relaxing and enjoyable.
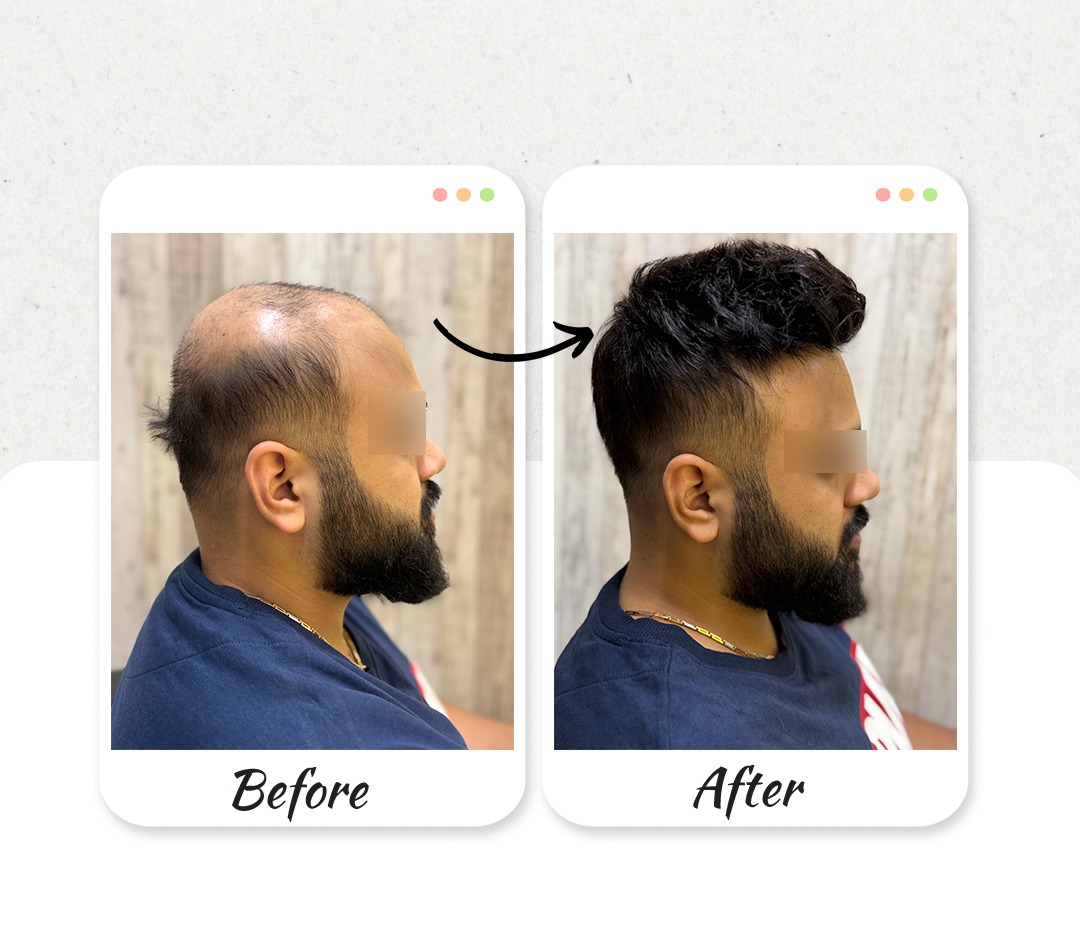
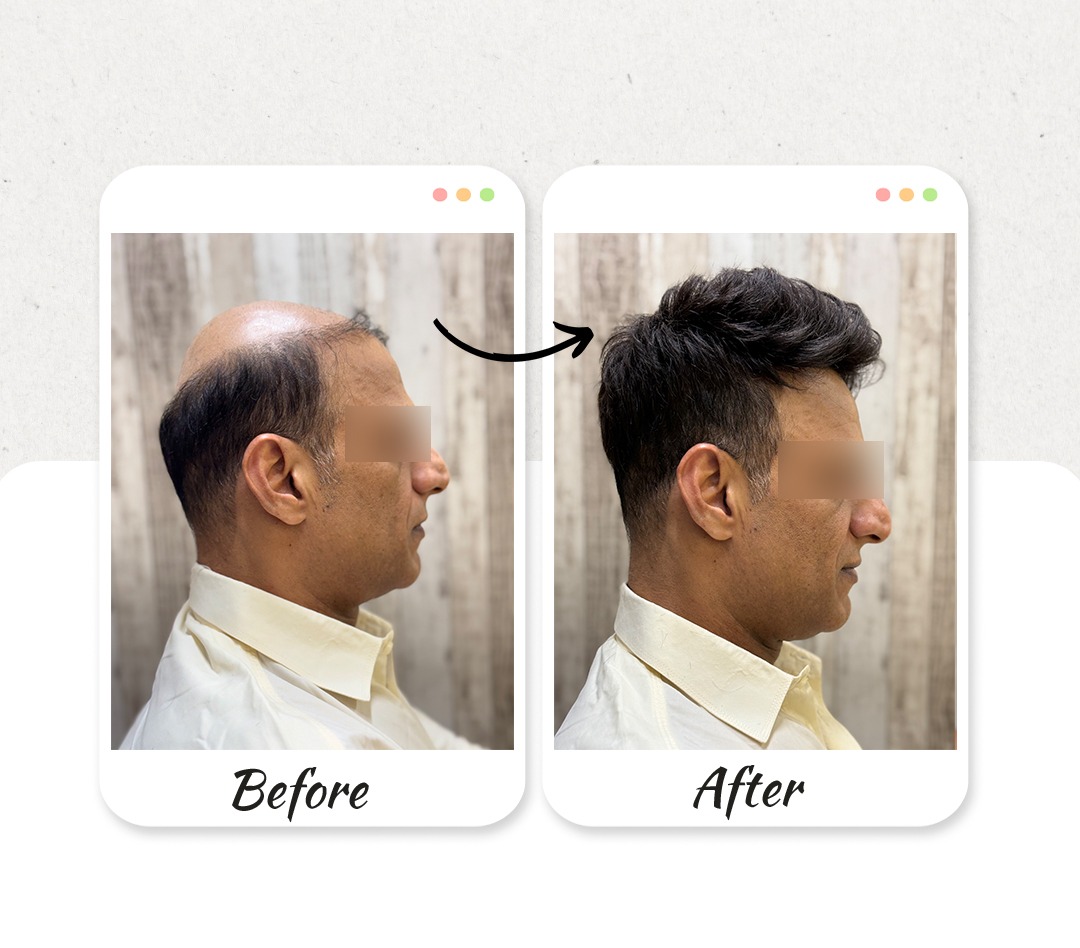
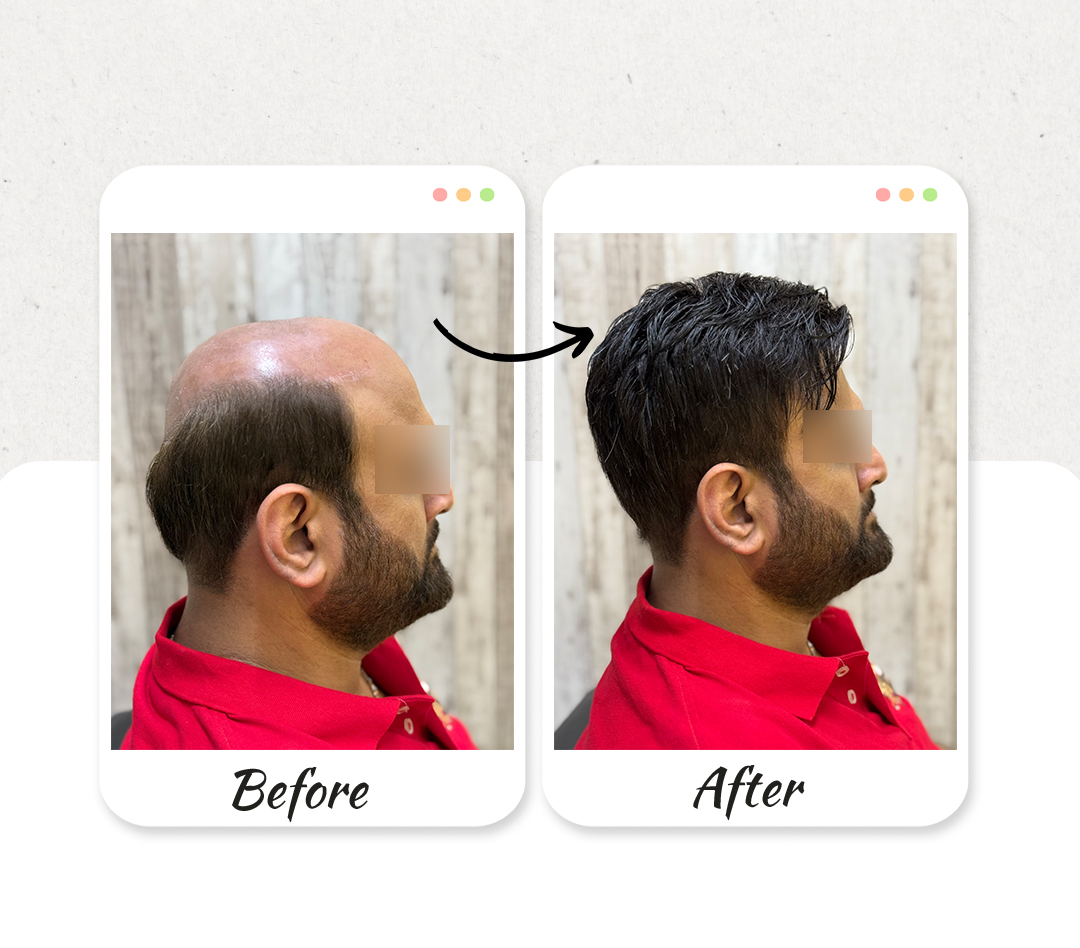
What Results Can You Expect?
After the session, you walk out with:
- A natural hairline
- Fuller, healthier-looking hair
- A more youthful appearance
- Boosted confidence
- A style that suits your personality
Your hair will flow naturally, allow styling freedom, and move just like real hair.
Why Hair Destination Studio Is the Best Choice for Hair Patch Fitting
Choosing the proper studio makes all the difference.
Hair Destination Studio offers:
- Highly trained non-surgical hair experts
- 100% natural Remy hair systems
- Custom measurements & tailor-made fittings
- Advanced scalp-safe adhesives
- Seamless blending techniques
- Professional hairstyling
- Transparent consultation
- Comfortable hygiene-focused environment
- Two convenient branches: Powai & Malad
Hair Destination Studio transforms not just your hair—but your confidence.
Final Thoughts: What to Expect from a Hair Patch Fitting
A hair patch fitting is a simple, comfortable, and enriching experience.
To summarise, the step-by-step process includes:
- Personal consultation
- Measurement & template creation
- Scalp preparation
- Base customisation
- Attachment (tape or glue)
- Blending, cutting & styling
- Final inspection
- Aftercare guidance
By the end of your visit, you leave looking like the best version of yourself—instantly.
If you’re planning to get a hair patch, knowing what to expect helps you feel confident and ready.
And if you’re choosing Hair Destination Studio, you’re already in the best hands.